


 レシピを投稿する
トップ > 「雑貨・小物」のDIYレシピ > LED照明付きのドールハウスを作ってみた
LED照明付きのドールハウスを作ってみた

Taatan
2018年06月07日
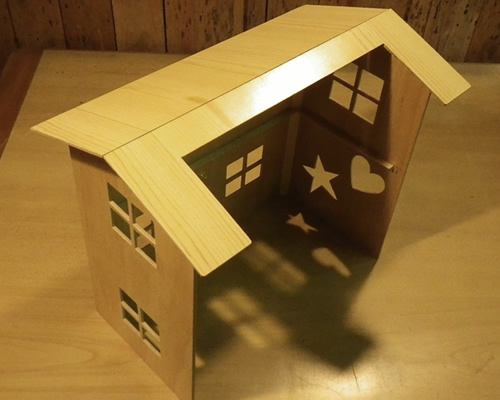
姪っ子から、小さいお人形(シルバニアファミリー)を入れて遊べるお家が欲しい!という要望があり、市販のドールハウスよりも楽しめそうな仕掛けのついたドールハウスを作ってみました。
かかった費用: 3,000円
所要時間: 5時間
いいね
9
お気に入り
2
このレシピをシェア


材料
シナベニヤ4mm厚 1枚
ラワンベニヤ12mm厚 1枚
10×24mm木材 1枚
三角材 2本
ポリプロピレンフィルム 1枚
スリムビス 適量
角型LED 2個
単3用電池ボックス 2個
配線コード0.5径 1本
スイッチ 1個
ラワンベニヤ12mm厚 1枚
10×24mm木材 1枚
三角材 2本
ポリプロピレンフィルム 1枚
スリムビス 適量
角型LED 2個
単3用電池ボックス 2個
配線コード0.5径 1本
スイッチ 1個
工具
インパクトドライバー
ディスクグラインダー
丸ノコ
卓上丸ノコ
卓上糸鋸
サンドペーパー
クランプ
ディスクグラインダー
丸ノコ
卓上丸ノコ
卓上糸鋸
サンドペーパー
クランプ
step1
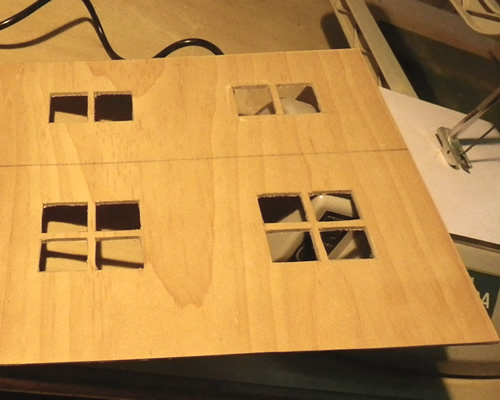
まずは壁を作るため、寸法を決めてシナベニヤを切り、卓上糸ノコでマドの形に切り抜きます。
step2
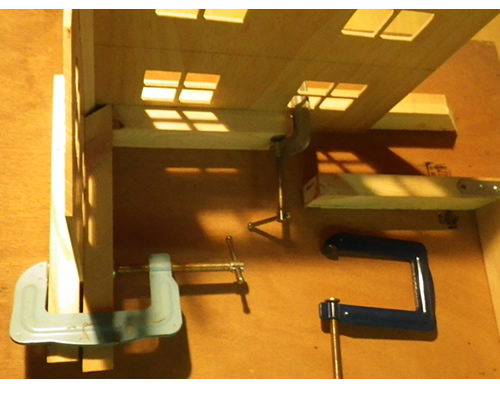
L字に固定した木材をコーナークランプ代わりにして、手持ちのクランプを使って壁を固定し、三角材を木工ボンドで接着します。
step3
接着材を乾燥させている間に、階段となる材料を切り出します。 同じ長さに切った小さい角材をシナベニヤで挟み込み、ボンドで接着します。 このときクランプで圧着しておくと確実に接着できます。(締めすぎるとクランプの跡が付くので注意!)

step4
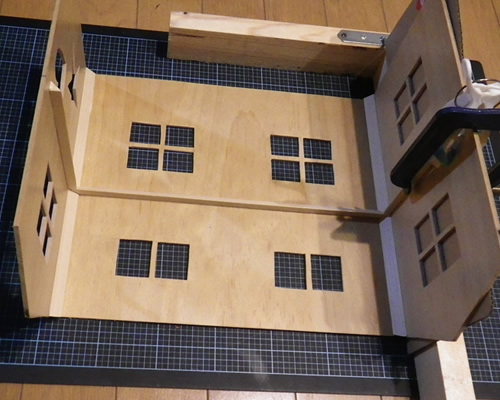
反対側のカベも接着しながら、2階の床を取り付けるための支えの木材も接着します。
step5
接着できたら、今度は屋根を切り抜き接着します。屋根がたわまないように、屋根の中央にも支えの木材を入れています。 手前の屋根は、中が見やすいように切り込みました。
step6
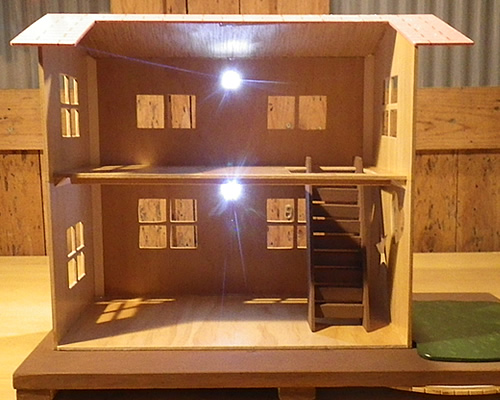
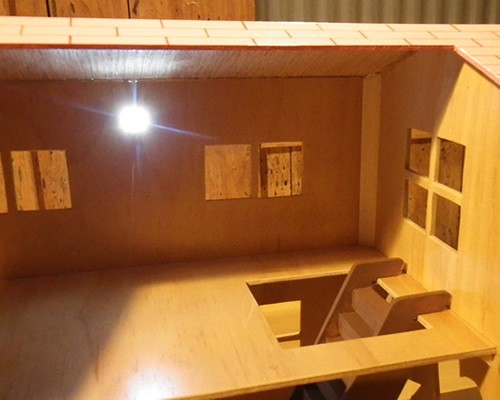
さらに、二階の床を接着し、壁にLED用の穴を空けて埋め込んだら、家の裏側に配線をまわします。 そこに単三用電池ボックスを直列に2個つなぎ、スイッチも付けました。電池の出し入れがしやすいように、開閉するフタも作りました。

step7
点灯確認すると・・・ほどよく光って本当の家のよう?電気を付けたり消したり、楽しくなりそうです♪ 二階の床には穴を開け、そこに階段をひっかけます。(違う向きでもかけられます。)
step8
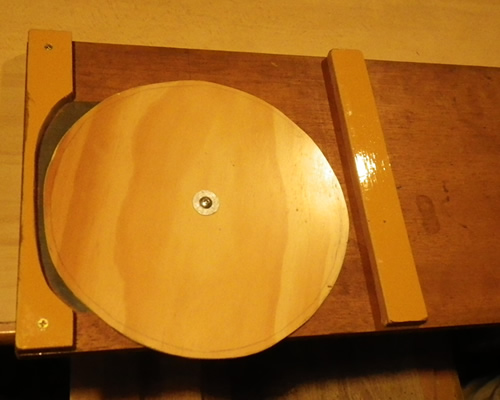
今度は家の土台の板を切り出し、裏側に円盤状に切り抜いた板を付けました。円盤のフチには滑り止め用にギザギザの溝を入れています。
step9
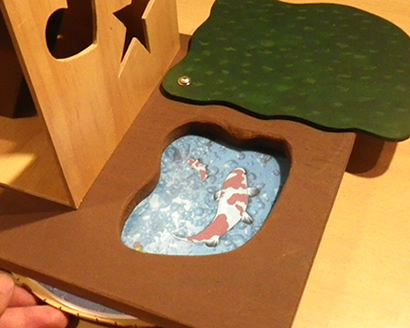
表から見ると、円盤は芝生模様の庭に隠れるかたちとなります。その庭を手でスライドさせると・・・

step10
池が出てくるようにしました! 円盤を回すと、円盤に印刷された池の鯉や魚達の絵がクルクル回る仕掛けです。
step11
土台と円盤の間には、ポリプロピレンフィルムを貼っているので、そこに小魚などの小物を置いても、小魚は動かず浮いたような状態で、下の池だけ回るという不思議なギミックが楽しめます。

step12
屋根にはピンクの塗料を塗り、赤いペンで線を引いてレンガの屋根っぽい雰囲気を出しました。これでひとまず完成! なかなか面白いドールハウスになったのではないかと思います。

step13
暗いところでLEDの灯りをつけて夜のドールハウスを楽しむこともできます。 お人形で遊んでいると子供は予想もしない行動をするので、様子をみながらまた改良していきたいと思います。

コツ・ポイント
卓上糸ノコでマドを切り抜く時は、始めにドリルで穴を空けてから、そこにノコの刃を通すことで切り抜くことができます。
やってみた感想
ドールハウスを移動するときに、無意識に屋根を持ってしまうので、屋根をもっと強度アップしたほうがいいかなと思いました。とても喜んで遊んでくれているので大満足です!

このレシピのキーワード
いいね
9
お気に入り
2
このレシピをシェア
ログインしてコメントする
このレシピを投稿したユーザー
日頃から身の回りの物や便利アイテムを作ったりしてDIYを楽しんでいます。
不便を感じたらそれを解消できる物を考え制作し、必要なパーツも市販で無ければ可能な限り自分で作ります。
大工などの経験は無いですが、今まで独自に得てきたノウハウやアイデアでどこまでやれるか日々挑戦中です!
投稿済みレシピ(165)
2025年06月29日
2025年05月16日

2025年04月27日
2025年02月28日
2025年02月13日

